Showing posts with label yummy family fun friday. Show all posts

Monday

4th of July SALE SALE SALE!


4th of July is here, and you are going to be with lots of family and friends. What are you going to do? Do you need some great games and activities to play together?

You're in luck. The Family Fun Friday Activity Book, in PDF version is ON SALE right now. For the next 24 hours you can get the complete book for $7.99. Delivered straight to your inbox.

It will arrive in time for the 4th of July celebrations. You will have your download before the end of the today, and you will have all you need to have a great 4th.

This is also the perfect time to buy the book so you have it for your family reunions, lazy summer days, and family road trips and get togethers. The games are also great for girl's camp, scout camp, block parties. You name it.

To purchase, simply click the red "Buy the Book" button on the top right of the page.


Be sure you leave your email in the notes to seller so that I can get you your book quick.

Remember, Families that play together, do stay together. Let me help your family spend time together.

p.s. you can also purchase the Hard Copy of the Book ON SALE for the next 24 hours also. Simply click on the same red button and choose the book. It will be shipped quick, just not by Wednesday. :)

p.s.s. Book cannot be made into multiple copies or sold or reproduced in any maner.

Friday

FAMILY FUN FRIDAY-Spaghetti and Gummy Bears

Round up the family, it is time to play with your food.

For this game/activity, you will need

 Spaghetti Noodles (Uncooked)

Gummy Bears

Objective: To construct a tower made of spaghetti noodles and gummy bears. The tallest tower wins and must stay standing for three minutes. 

Rules: You can play as individuals or in groups. If you have a lot of people, groups of 4 work really well. More than 4 will work, but it is hard for everyone to be involved. Towers must be built of only spaghetti noodles and gummi bears. Nothing else.  If your tower falls, before the 3 minutes is over, it doesn't count. Tallest tower wins. 

From experience, I have found that each person, or group, will need about 75 gummi bears. You will want the gummi bears to be fresh. Stale gummies will not be any fun. You will want a good handful of noodles for each person or group also. When the game is over, you have a built in treat. :)

TIP: Do you have very small children? You and hubby build the towers and have the children be in charge of warming up the gummy bears. 

Have a Great Weekend!

FAMILY FUN FRIDAY-Tim Tam Slam!

Our sunny warmer weather has once again given way to snow and cold. Just when I hoped it was gone, it is back.

SO,
 In honor of the storm, or in hopes that this will be the last snow storm of the winter (if only we were that lucky), we celebrated. 

Enter 
THE TIM TAM SLAM.

What is the slam you ask? Let me tell you. But be warned, once you have been hit by the slam, there is no turning back. 

What you need...


Tim Tam's
There is no substitute. You can find them at your local stores. SuperTarget, WalMart, grocery stores. They will be with the other cookies. (They have only recently hit stores in the US. You use to have to have a nice friend who would bring them back from visiting Australia.) The cookies come in chocolate cream and caramel. We like the chocolate cream. 

Hot Chocolate
Pick your favorite, but, any brand will work. Use what you have in the cupboards. Make enough so that everyone can have a cup.

Now...

Take a Tim Tam and bite off opposite corners. So your cookie looks like this....


This now becomes your straw.

Put the corner of your Tim Tam into the hot chocolate and start to suck the hot chocolate through the cookie.

Brace yourself. The hot chocolate will melt the inside of the cookie as you eat. It is really good. And really fun. 

Keep drinking through the cookie until most of its middle is gone.
Then, slam that cookie. AKA, eat it.
Grab another cookie to start again. 

And Again,
And Again.

And that my friends, is what you call the Tim Tam Slam.

Have a wonderful weekend.

HAVE YOU EVER HAD A TIM TAM SLAM?
DO YOU HAVE SNOW AT YOUR HOUSE?

FAMILY FUN FRIDAY-Valentine Lollipops!


Our daughter came home from school today and asked if we could give her teacher a special gift for Valentines Day. I said sure, assuming we would work on it in a week or two. 
She meant can we make her a special gift RIGHT NOW. RIGHT NOW as in TODAY.
So we got to work.  

Just like many of you, we have left over candy canes from Christmas. There are lots of different variations of this around the blogosphere. 

The object for us, is for the activity to be able to involve the whole family, especially the kids, (after all, it is Family Fun Friday.) This is how we do it in our house.

(*These are perfect gifts for teachers, students, friends, neighbors, Visiting Teachers. Anyone*)


You Need...

Regular Size Candy Canes
We have lots of yummy flavors this year. Peppermint, bubble gum, and Cinnamon. The colors are perfect for Valentines Day. You can also make mini versions using mini candy canes.

White Chocolate Chips
You can use white candy melts. 

Lollipop Sticks
The long ones work best, but the short ones will get the job done also.

Valentine Sprinkles
Colored Sugar, Jimmies, anything goes. I like to buy the assorted containers for each holiday. They give me lots of choices. 


Let's Get Started...

Preheat your oven to 300*. 

Butter your cookie sheet. I used parchment paper and ran some butter across it. Cooking spray would work also. I prefer the butter.

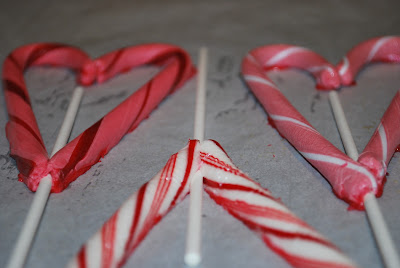
Lay two candy canes down to form a heart. 

Take the lollipop stick and put it down the middle of the heart. 


Put your candy canes in the oven. WATCH THEM VERY CAREFULLY! It will only take about 3 minutes. As soon as the bottoms start to melt and bubble, take them out. 

Pinch the ends together to "close up" your heart and help it wrap around the lollipop stick. 


Let the lollipops cool completely. I take them off the cookie sheet after about 2 minutes and let them cool on a rack. Faster that way. Once everything is cool, put them back on the cookie sheet.

Meanwhile, get your white chocolate chips and sprinkles out. 
Put your chips in a ziplock bag. Leave an opening in the bag so it doesn't explode in the microwave. Put your bag of chocolate in the bowl. Put the bowl in the microwave. This will keep it upright while it is melting.

Melt for about 30 seconds, take the bag out and knead. Back in for 30 seconds, out to knead. Continue until the chocolate is melted and there aren't any lumps.


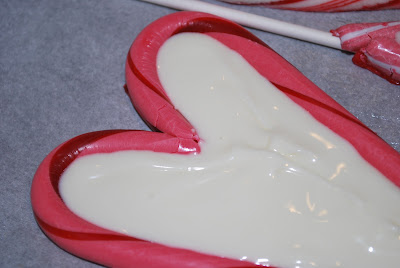
Once your chocolate is melted, cut a little hole in a corner of your bag and start to fill in the middle of your hearts. 

The key to making it smooth, After you fill the middle, take a toothpick and smooth things out. 


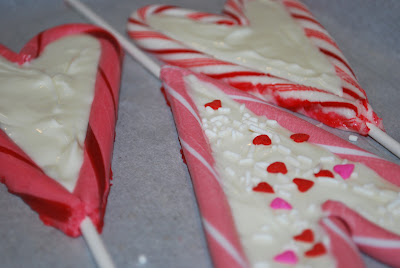
Now it's time to decorate. take your sprinkles and get to work. 


I am not so sure about the purple, our daughters choice.  


Let them cool completely. I set the cookie sheet on the cold garage floor to speed things up. DON'T put them in the fridge or freezer. You will have a "sweaty" lollipop. Yuck!

The finished product.
We will take the hearts, put a lollipop bag over the top and tie them with a ribbon. 
Our daughter wants to take them to her teacher tomorrow. I asked if we could at least wait until the calendar says "February." 

These are so fast to make. We will make them fresh in two weeks to give away. 


VARIATION...
Our daughter woke up from her nap, right in the middle of our project. She wanted to help but I didn't want her around a hot cookie sheet, or the oven. 
SO, we skipped that step. The melted chocolate will hold the candy canes and the sticks in place. All you have to do is form the hearts and put the sticks in the middle. Melt your chocolate, pipe it in, add your decorations and let it all cool. Perfect for even the youngest helpers. 

Do you have left over candy canes?
What do you think about the purple?

Happy Friday!

FAMILY FUN FRIDAY! Candy Corn Parfaits


Last week I was at our elementary school. Our daughter's teacher had a picture of halloween parfaits on her bulletin board. Loved it. The picture was brown and orange puddings with layers of whipping cream and cocoa puffs.

We made our own version with candy corns, for a YUMMY FAMILY FUN FRIDAY! It is perfect for little hands and everyone can use their creativity to make their own. 

Halloween Candy Corn Parfaits

You will need...


Chocolate Instant Pudding
French Vanilla Instant Pudding


Candy Corn
Cocoa Puffs Cereal
Food Coloring


Whipping Cream

Get all of your ingredients ready.

1. Make your chocolate pudding.

2. Make your french vanilla pudding. It will be yellow.

3. Take half of your french vanilla pudding and put it in another bowl. Add two drops of red food coloring and 4 drops of yellow food coloring. Now you have orange.

4. Whip your cream. 


Now comes the fun part. Start assembling.

Everyone was able to do their own. 

My favorite combination was

Cocoa Puffs
Yellow Pudding
Whipping Cream
Candy Corns and Cocoa Puffs
Chocolate Pudding
Orange Pudding
Candy Corns and Cocoa Puffs
Whipping Cream
Candy Corns and Sprinkles for garnish


My husband can't stand candy corns, so you will notice his in the back, candy corn free.

Our kids LOVED making their own layers.

This would be perfect for an after trick-or-treating snack. Add it to the Snickers bars that will soon be coming home. 

Have a great Halloween Weekend.
In Provo, Utah, everyone will be trick-or-treating on Saturday instead of Sunday.
We will have a black cat, a witch, and our son decided to be a hobo. Where he came up with that, I have no idea. 

DO YOU DRESS UP FOR HALLOWEEN? 
AS WHAT?


FAMILY FUN FRIDAY! Spooky Oreo Lollipops.

I have seen chocolate covered Oreos all over town lately. A sign that the holiday season is right around the corner. A saw a few at a boutique this week that were covered in halloween sprinkles. We decided to make our own scary version. 

One of the greatest things you can do with your kids (besides read to them) is cook with them. It teaches them valuable skills, not to mention it is a great time to talk and communicate. Head to the kitchen for a YUMMY FAMILY FUN FRIDAY!

YOU WILL NEED


 We only eat the Double Stuffed in this house. Otherwise I catch everyone unscrewing them and putting two together.


Melting Chocolate 
 White Chocolate Chips will work also. 


I had these little icing tubes in the cupboard. You don't have to have these though. You can color the chocolate and get the same effect. 


Food Coloring. I found out that the tubes by Wilton make my chocolate seize.  So stick to the drops.


Lollipop Sticks, or in our case, wooden skewers.


Green gumdrops or jelly beans for the pumpkin stems. 

LET'S GET STARTED


Take your skewers or sticks and push one into each Oreo, to make a lollipop. 


Melt your chocolate either on the stove in a double broiler, or in the microwave. 
Once your chocolate is melted, separate it into three bowls and color your chocolate.
1. Leave one Bowl White,
2. One Bowl Orange (four drops yellow, two drops red)
3. One bowl Green


Dip your Oreo pops in the melted chocolate. The kids found it easier to drop a big spoonful of chocolate on top of the Oreo and let it run down and around the sides and bottom.  


Lay your freshly dipped lollipops on parchment paper to cool.
While they are cooling, put the stems on your pumpkins and add any other embellishments you want. Our son wanted broken candy corns for his monster teeth.  You can speed things up by putting them in the fridge.


Time to decorate. Anything goes, just make it spooky.
If you don't have tubes of icing, take a little melted chocolate and add some food coloring. Then put it into a plastic sandwich bag and snip the corner. Now you have a quick, homemade piping bag. I actually used that trick for the spider web. 


Once they have cooled they are really sturdy. You can stand them up in a vase filled with candy corns and display them in the kitchen. Don't expect them to stay their long. Yum.

WHAT ARE YOU DOING THIS WEEKEND?
IS FALL IN YOUR AIR? IT FINALLY HIT US THIS WEEK.

 
Designed By: Wacky Jacqui's Designs